This page is all about my spreadsheet-based Word Search Creator. Why in the world would someone need a Word Search Creator? Well, I did and I thought other people might want to use it, too. This spreadsheet allows the user to fill in words to be searched in any orientation, as complex or simple as wanted, and then fill in the empty space around with random letters to have a ready to print puzzle for kids of all ages.
I made this Excel spreadsheet up after I tried to do this manually once. I made a sheet with a bunch of square cells and filled in about 10 words for a word search I wanted to use at a Cub Scout meeting. I then tried to randomly put other letters in the empty space, but it is hard to be really random and takes a lot of concentration, particularly if there are a lot of spaces to fill.
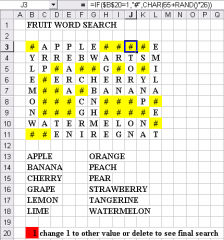
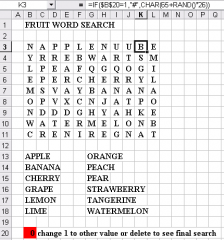
So, after a few different iterations, I made the current version which allows a user to put in letters of a word, a letter at a time, in all CAPS. The spaces show the letters in white and the unused spaces have a # symbol initially highlighted in yellow. However, once you are finished or just want to see what it looks like with all the spaces filled in, you just change one cell and the whole word search transforms. Like this:
These are two examples each with the same words to be searched, but with the random fill spaces turned off and on. With the empty spaces in yellow, you can see a lot of the words fairly easily, but when the empty areas fill in, it’s a lot harder!
The yellow cells have a formula in them that either puts a random letter in them or a yellow # sign, depending on the contents of a single special cell, A43. If that cell has a “1” in it the unused cells have a yellow # sign in them. If the cell has anything else- a zero, a blank, whatever, the formula puts a random letter in every unused cell.
Ready to give it a try? Here’s how step by step:
1. Download the blank word search. Click here to get the spreadsheet. It’s a fairly old version of Excel, so you shouldn’t have any trouble opening it or have any compatibility issues. If you want to look at a simple completed example for comparison, click here to download the Fruit Word Search shown in the slideshow above.
2. Estimate how big you want your word search puzzle to be. For example, the Fruit word search is 11 letters wide and 9 long, and fits in 12 words. A lot of words can be fit into a fairly small area. The bigger the puzzle, the harder it is to find words. You can change this later, but once you start, taking space away may be hard if you’ve spread words throughout the space you made and you want to compact it. Adding space is easier- you just copy and paste “empty” cells with the yellow # in them. The sheet you downloaded comes 29 wide by 42 long. Generally, smaller is better, but it’s your word search puzzle, so do it as big as you want.
If you know you aren’t using that much space, just delete the cells you don’t want. They’ll turn white and blank. Be careful not to delete or overwrite the “1” in cell A43. This is the cell that turns the blanks from yellow #s to random white letters. If you need the A43 cell for more puzzle space, just “move” the cell contents by cutting and pasting, or dragging the cell to a location that is better for your format. Save your work before you do this or any other major change to format, so you can go back if you mess up the formulas in the spreadsheet.
3. Change the “1” in A43 to a “0” and then change it back to “1.” Notice how the unused cells change. Make sure you know how do switch this back and forth, so you’ll be able to do it later when you want to finish up.
4. Make your list of words to search. I like to put them below the puzzle on the spreadsheet. Any cells that used to have unused cells that you deleted probably are formatted to center justify text, so you may need to change the cell formatting to left justify for it to look right. It’s up to you.
Another option is to make your list as you put each word into the puzzle. Again, it’s your choice.
5. Put a word into the puzzle. Pick a spot, any spot. I’d suggest the spot where “WORD” is in the puzzle as an example. Put on your CAPS lock and type away. Put in a letter, then use the arrow key to move up, down, left, or right to the next cell for a letter. Type that letter, and just keep going. You know the deal for word searches, you can go left to right or right to left, top to bottom or bottom to top, or diagonally in any way. Remember that left to right and top to bottom are much easier to find than any other option. If children are your target, keep it simple. Average fourth and fifth graders can find some odd orientations, and middle schoolers can find even more, but don’t make it overwhelming. Of course, if making an incredibly hard word search is your objective, then fill it full of backward diagonals! You’re the boss!
Unless WORD and SEARCH are part of your search, you’ll need to either over-write them or copy unused cells and paste over them.
6. As you add words, decide whether you want to share a lot of letters. In my Fruit word search, the word “APPLE” is on the top row, and the second P is the first letter of the word “PEAR.” The more shared letters, the more difficult the words are to find, but as always, it’s your call. See how many words can use the same letter if you dare.
7. As you add words, make sure you are keeping a list for people to search them out later. I like to type them out on the spreadsheet as I go. They don’t have to be organized, you can do that after all the words are in the puzzle, if there isn’t any organization to how you are entering the words in the puzzle.
8. Eventually, you may determine that you need more spaces or have too much space. For too little space, the solution is fairly simple as mentioned before, just click on an unused space with the yellow # in it and copy it. Paste it wherever you need more space. I did this in the Fruit example. The bottom two rows with Watermelon and Tangerine were added as an afterthought.
If the puzzle is big for the number of words used, it’s problem time to delete some cells. But if you’ve spread the words everywhere, you may have to go back and move some of the words out of areas you want to delete and into areas you want to keep. To do this, re-type the word in a new location where you want it. Then, for any letters that aren’t going to be deleted from the puzzle, copy an unused yellow # sign cell and paste it over each letter that you had used for a word before. You actually have to copy and paste a cell with the random formula, you can’t just type a # sign in a cell. The formula is what makes everything switch around when the special cell is changed to a value other than “1.”
9. When your puzzle is done, it’s time to get the format just right. In my Fruit example, I took the list of words and sorted them into alphabetical order and then split them into two columns. Maybe yours should be three or four columns. Whatever looks best to you.
You should do a print preview. Is everything showing that you want to show? Change the print area if you need to so everything fits. You may need to shrink to fit or expand the puzzle to fill up the page. Generally, I think it is best to keep everything on one page and make it as big as possible on that page.
10. Either delete or change the value of the special A43 cell from “1” to something else. This will cause all the unused cells to fill in with random letters.
11. Save your work and print copies for everyone who you want to challenge. You can even print a copy with the highlighted # signs for reference.
That’s it! For most folks, I think I’ve written more detail than you need, but you still may need to refer to this sheet the first time or two you try this.
How it works
For those who are curious about what goes on behind the scenes, here’s the explanation. As mentioned before, everything is based on a formula. In the fruit example shown, the “special cell” was moved to B20, instead of A43. The cell is highlighted in red. Every unused cell in the puzzle (where a specific letter wasn’t typed in) has the exact same formula:
=IF($B$20=1,”#”,CHAR(65+RAND()*26))
So what is this? This is a combination of three functions and some math. The $ signs are to “fix” the cell address so that when the formula is copied it always refers to B20. Without the $ signs the cell address would change relative to where the formula was pasted. First, the formula is an IF-THEN-ELSE function. If the value of B20 is 1, then one thing happens, if not something else happens. The commas in the formula separate the arguments between if, then, and else. The middle section “#” is what happen when the if portion of formula is true. So, in this case if B20 is 1 then the cell will get a # in it. The last section, CHAR(65+RAND()*26) is two more functions that are used if B20 is anything else but 1. The function, CHAR is short for character- the function will put one character into the cell. There are 255 possible characters that are part of every font that can be displayed. These characters include numbers, letters, and symbols. There is a standard for what number goes with each character. Capital letters start at CHAR(65) for A and go through CHAR(90) for Z. However, we want different, random letters in each unused space, which brings us to the final function of the formula, RAND. RAND is short for random. The function, RAND() returns a value between 0 and 1. For the characters we are wanting to put in the puzzle, we need numbers for the characters that are between 65 and 90. So, the formula starts with a value of 65 and adds a random value between 0 and 26 to it by multiplying RAND() times 26. The function RAND() can give a value of 0, but will always be less than 1, so the value multiplied by 26, will never actually be 26, but 25 at the most. Added with 65, the total can be as low as 65 (RAND=0) and as high as 90 (RAND x 26 = 25, and 65+25 = 90). So the CHAR function will then get a character between A and Z, randomly. You may be aware that there are more powerful versions of the random function in Excel. This is true in newer versions, but not all versions. The RAND() function is more universal, so that’s why I used it.
What about the yellow cells you may ask? Well, that is conditional formatting. If the value in the cell is “#” then the cell is yellow, if not, it is whatever color it was shaded- in this case, white. Depending on the version of Excel you use, conditional formatting is set up through a top menu item as part of the formatting section. Click on one of the cells used in the puzzle and select conditional formatting to see how it works in your version.
I have one more example from Scouting. Check it out on its own page. The spreadsheet doesn’t have the special switching cell but the rest of the process was done the same as the examples on this posting.
While word searches aren’t part of the work my company does, we do crunch a lot of data in spreadsheets. Using combinations of functions to get a report to show data in right way is part of the job.
Any questions or comments are welcomed. Comments you make may not appear right away due to spam-fighting systems that are in place for the site, but they are all read and any legitimate comment will be posted after review. Use the share buttons to share this page with others if you find it useful.


One Response to Word Search Creator